Module Level 2 - Two Point Perspective Pt 1
Drawing Cubes Now that you have levelled up on one point perspective, let’s step it up a notch with two-point perspective.
Two-point perspective is commonly used by artists when drawing their scenes or even in photographs. It is the most common view we see every day as we normally view objects and buildings at our eye level and not look up or down at them. While one point perspective gives ultimate simplicity with a plane’s corners leading to one vanishing point, in the two-point perspective, a viewer sees the plane at different angles one of the vertical corners is always closer than all the others. From this corner, all other corners are vertical, and all drawing lines converge to two vanishing points.
You can start the drawing in two ways.
First way
Dawing a vertical line gives you the top and bottom edge of your cube. The same line allows you to estimate the size and position of the shape you are about to draw. Also, when it comes to drawing shapes provided in these lessons, the verticle line will help give you a starting point. (Tease shapes)
Second way
You can start with two construction lines converging from either vanishing point (VP1 or VP2), still giving you an idea of the position of your shape, but in my opinion, it is one line too many If you want to start again and haven't got the position just right. For example, you may end up with a skewed line. (Example)
I will use the first way because it helps me the most.
Note
If you are drawing the 2 points too close together, ‘warping’ could take place in your drawing.
Step 1
As usual, we start with our horizon line. But this time, we have two vanishing points. Vanishing Point 1 (VP1) and Vanishing Point 2 (VP2) are at either end of your page.
Step 2
Once you have drawn the horizon line connecting the two vanishing points, you now draw the vertical line in the centre of the page. This is the prominent corner of your shape. (Note: This line can be drawn anywhere on the page, but we are placing it in the centre for this example and not getting a morphed shape.)
Step 3
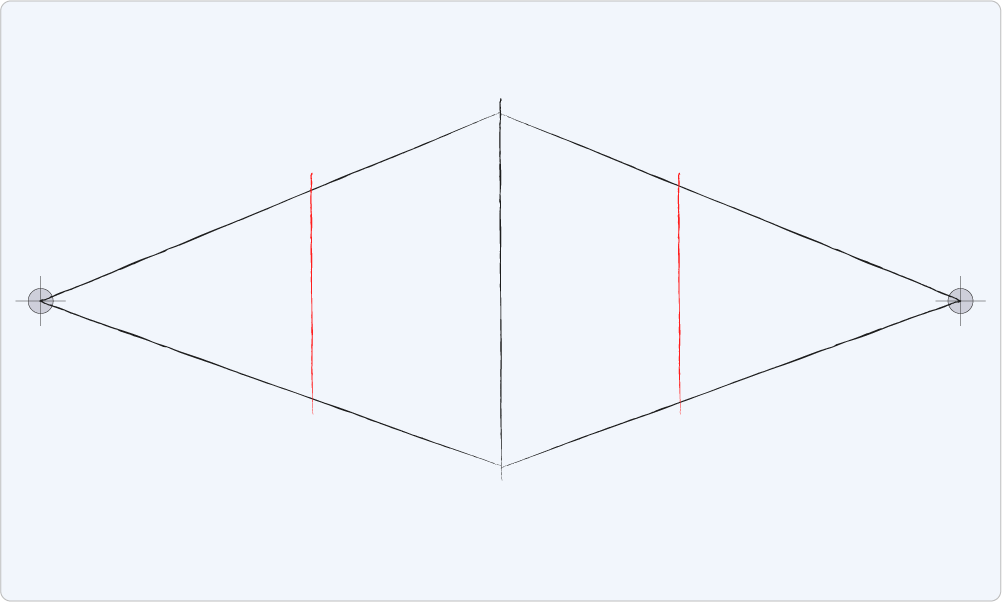
Next, draw your construction lines converging from both vanishing points to the central vertical line.
Step 4
Draw two more corner lines on each side parallel to the first verticle line you drew. These are the two other visible edges of your cuboid.
Step 5
We could stop here and add rendering as it shows the two sides of our cuboid that we would typically see in our everyday view giving us a solid opaque look.
But we want to take it further and see all sides of our shape. So as you can see, I have added the other construction lines from other vertical lines revealing the planes we can’t normally see behind our sold shape.
Step 6
Lastly, let’s add the last verticle line which is the furthest corner from our view.
Step 7
Let’s start rendering the cuboid. First by rendering the front planes the back two planes to show the three dimensions of the shape.
Step 10
Lastly, remove all construction lines.


